• Skip to primary navigation
  • Skip to main content
  • Skip to primary sidebar

Marcie Besecker Designs

Paper Crafting is my therapy!

  • Home
  • Online Exclusives
    • Online Exclusives
  • Bingo/Classes/Paper Share/Misc
    • Bingo / Classes / Paper Share / Misc
    • Shop Stampin’ Up! Online
    • IN-PERSON Classes
    • Video/PDF Only
    • Available Kits
    • Join Paper Pumpkin
    • Clearance
  • Videos
  • Join My Team
  • About Me / Contact
  • Team Home
    • Team Meetings
    • PDFS
    • Quick Reference
  • Request a Catalog
  •  

🌸 Tips and Tricks for All Things Fabulous and creating two cards

October 13, 2020 Leave a Comment

With these few tips and tricks the All Things Fabulous will become a favorite “go-to” stamp set for flowers.  These flowers make fun cheerful cards but would be perfect for sympathy, baby or wedding cards too.  On this card I used the largest rectangle die from the Stitched So Sweetly die set.  The Designer Series Paper (DSP) is from the Flowers for Every Season 6″ x 6″.

What I like to do when the mojo isn’t flowing is to color or mass produce something to have ready for cards in the future.  This stamp set is perfect for that.  Work with different colors and see what works for you and what colors you like that work together.  Here is what I do.

This is a perfect way to get practice lining up the images AND working out the color combinations that you like.

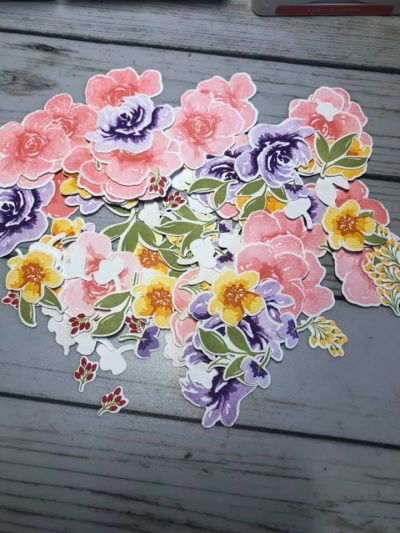
With the various different images you can cut out many at the same time.  Many of the little flowers have two dies which makes cutting them out must faster.

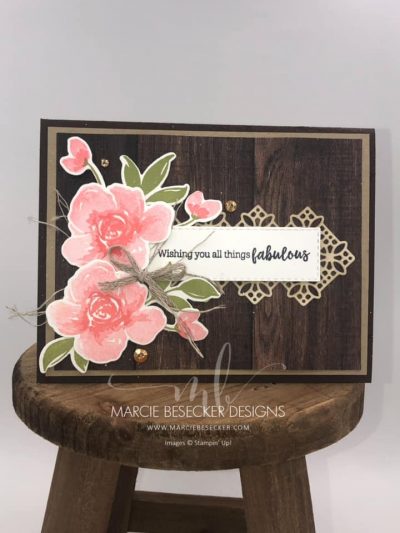
I wanted to create a more neutral softer tone card.  Here I used Early Espresso card base cut at an A2 size with a Crumb Cake panel ( 5 1/4″ x 4″) with a dark wood grained DSP from In Good Taste cut at 5″ x 3 3/4″).  The delicate die image was cut from  cut Whisper White Paper and I used a blending brush to add some Crumb Cake color to add another layer on the card.  I added a bow and a knot piece of the braided linen trim to add some extra interest to the card.

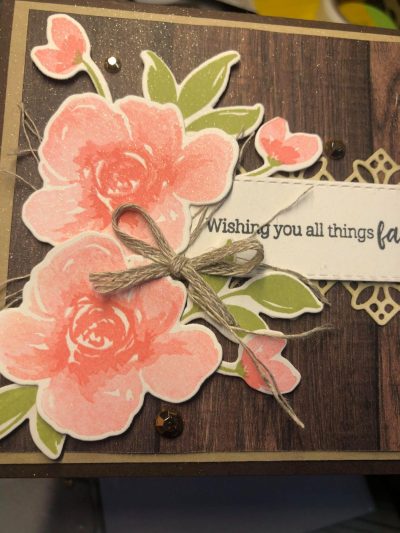
This close up shows that I also used the Champagne Mist to add shimmer to the card.

Here are the colors that I chose to create with.

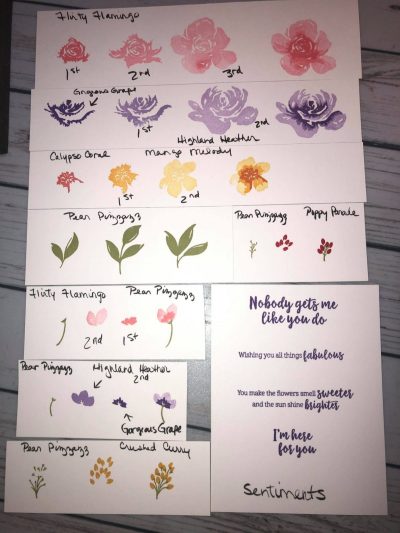
I added 1st, 2nd and 3rd on the papers to show which generation of stamping I used.

Video

The video shows more detail on how to align the stamps and creating these cards.

Thanks for stopping by and learning a little about the All Things Fabulous stamp set.  Make sure to say Hi if you catch me LIVE on YouTube.  Have a great week.

Supplies


Pin
Share
Tweet
Share
0 Shares

Filed Under: All Things Fabulous, Flowers, Techniques Tagged With: all things fabulous, birthday, flowers, three step, two step

Subscribe

to receive my articles delivered to your inbox!

I have been stamping on and off for over 25 years. I love learning new tips and finding new products and then sharing on my blog. I hope you'll subscribe and enjoy my posts. Thank you Read More…

Previous Post: « Curvy Celebrations for Holidays and More
Next Post: Let’s Celebrate You with the Bloom & Grow Wedding Card and Box »

Reader Interactions

Leave a Reply Cancel reply

Your email address will not be published. Required fields are marked *

Primary Sidebar

Shop my Online Stampin' Up! Store
  • Facebook
  • Instagram
  • Pinterest
  • YouTube

Marcie Besecker

Paper Crafter
Contact Me!

2025-2026 Annual Catalog

2025-2026 Annual Catalog

STAMP N STORAGE SHOPPING

I love the products from Stamp-n-Storage. In full disclosure, I am an affiliate with Stamp-n-Storage which means I may get commissions if you click on links I provide and decide to purchase anything from this company. I highly recommend this company.

The content in this blog is the sole responsibility of Marcie Besecker as an Independent Stampin' Up! Demonstrator. The use of and content of classes, services or products offered is not endorsed by Stampin' Up!

[mc4wp_form id=”975″]

Archives

Categories

Content © Marcie Besecker, All Rights Reserved. Privacy Policy
Genesis for Wordpress customized by WebsByAmy.