The Parcel Petals Treat Box and Card is such a cute pair. There is nothing like giving a gift box or bag with a matching card. The Parcel & Petals Stamp set and the Perfect Parcel die set is a set I overlooked for some time. I am surprised because it really does create a gorgeous project. These two projects were so easy and fast to create.

Measurements and Instructions
Card
Cardbase: 5 1/2 x 8 1/2″, score at 4 1/4″
Whisper White Panel: 5 1/4″ x 4″ – stamp panel with flower image
Use the stitched flower long die across the bottom of the panel x 2
Vellum – use a scratch piece that you can put the large flower image die and cut to adhere below the ribbon.
Adhere a piece of ribbon all the way across the card and use Tear N Tape on the back to hold the ribbon. Then tie a bow and place on top.
Stitched Shaped Dies is what I used for the sentiment. The largest for the colored cardstock and the second largest for the sentiment.
You can also use the Circle Layered Dies.
I stamped the flower image on the sentiment circle to add some fun color.
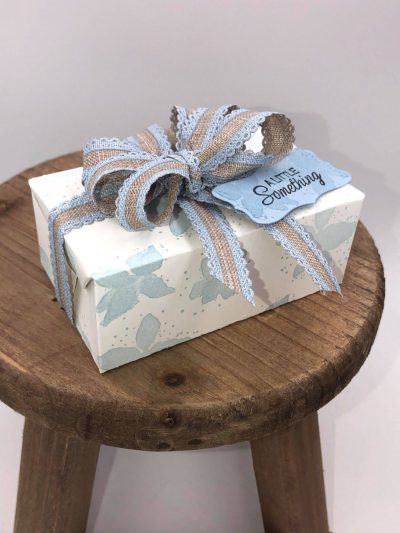
Box
Two 4 x 6″ panels of Whisper White – stamp the images on the cardstock before you die cut with the Perfect Parcel Dies.
Use Tear N Tape to adhere the box together. The video will help you see how the box is assembled.
Add the matching ribbon to the box and create a fun big bow but don’t adhere it to the box. Adhere the ribbon with glue dots to each other because this ribbon will be slid off to open the box.
Use one of the cute labels in the die set to create your sentiment.
Don’t forget to add a stamped image to the sentiment on the box too. I think it just helps make the project look finished.
I added metallic pearls in silver to the card and box (not show in the photos but I did it on the video).
Watch the video carefully as I show how to assemble the box. It is a bit confusing but totally makes sense when you see it done. Of course having matching ribbon is like the icing on the cake.
I think this would make a very pretty wedding card… that may be in the near future. The flowers are just so elegant and “soft”.

Don’t forget to use the matching cardstock to create some crinkle paper to add to the box for stuffing. With this ribbon you could also use Crumb Cake, or mix them.
Video
Check out the video of these projects HERE.
The supplies I used are listed below and also below. You can click on any item and it will take you to my shop. Make sure you check out the sales and specials too.
Reminder that the Get N Go special will be over at the end of the month. Click photo to see more.

Make sure you check out October’s special on the 1st 😉
Thanks for stopping by. Join me on my YouTube LIVE videos on Sundays and Tuesdays. Be sure to subscribe so you can get notified when I am LIVE or post. See you then.

Supplies
Leave a Reply