• Skip to primary navigation
  • Skip to main content
  • Skip to primary sidebar

Marcie Besecker Designs

Paper Crafting is my therapy!

  • Home
  • Online Exclusives
    • Online Exclusives
  • Bingo/Classes/Paper Share/PDFs/Misc
    • Bingo / Classes / Paper Share / PDF / Misc
    • Shop Stampin’ Up! Online
    • IN-PERSON Classes
    • Video/PDF Only
    • Available Kits
    • Join Paper Pumpkin
    • Clearance
  • Videos
  • Join My Team
  • About Me / Contact
  • Team Home
    • Team Meetings
    • PDFS
    • Quick Reference
  • Request a Catalog
  •  

Rosette Poinsettia Ornament

August 26, 2018 3 Comments


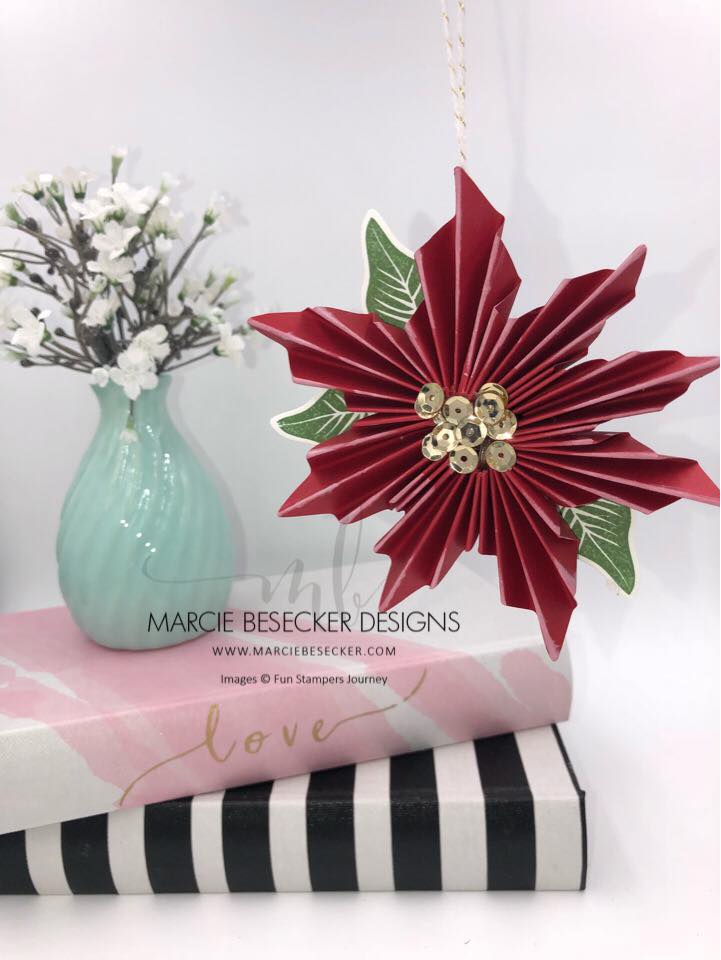
Fun Stampers Journey has a new Paper Fan Die that makes Rosettes. I love it. However, this Poinsetta Die was not made with the die, but with our amazing Journey Scoring Board.

Start with 8 x 10 piece of cardstockScore ever ½ inch on the 10 inch side (score first, it will save a lot of time)
Cut into two inch strips on the 8 inch side.
Cut those strips in half at 5 inches
Fold each strip in half, mark at ½ inch from the right on the open bottom end (the fold at the top)
Cut at an angle from the top left corner at folded area to the mark on the unfolded area (1/2 inch in from the right side)
Add tape to both sides of 4 of the pieces. Tape together with the points all pointing the same way.

I did a LIVE on Facebook and created a gold Poinsettia.  Hope this is helpful.


Supplies Used:

Pin4
Share
Tweet
Share
4 Shares

Filed Under: Holiday

Subscribe

to receive my articles delivered to your inbox!

I have been stamping on and off for over 25 years. I love learning new tips and finding new products and then sharing on my blog. I hope you'll subscribe and enjoy my posts. Thank you Read More…

Previous Post: « The NEW Platinum 6 is here!!!!
Next Post: Shaving Cream Technique with a Boost!! »

Reader Interactions

Comments

  1. Sherry Bullis

    August 29, 2018 at 9:58 pm

    Marcie do you have instructions on how you did the tree?
    My down line and I are trying to figure it out. Did you use the fan die?
    How many strips did you use on each level?
    Thank you so much.

    Reply
    • Marcie Besecker

      August 29, 2018 at 10:12 pm

      Hi there Sherry. Thanks for checking out my website. I don’t have instructions but it is fairly simple. Use 3 Paper Fan Dies for each row and glue them to a circle. Start out with the size of the die, then decrease a 1/4″ each row. Glue the bottom of the circle and set it on top of the bottom circle and all the way up. Using hot glue is the way to go. I used white liner to attach each fan to each other. I hope this helps!!!

      Reply
      • Sherry Bullis

        August 30, 2018 at 10:25 pm

        Thank you so much. We are going to try it. Can’t wait to see how they turn out.

        Reply

Leave a Reply Cancel reply

Your email address will not be published. Required fields are marked *

Primary Sidebar

Shop my Online Stampin' Up! Store
  • Facebook
  • Instagram
  • Pinterest
  • YouTube

Marcie Besecker

Paper Crafter
Contact Me!

2025-2026 Annual Catalog

2025-2026 Annual Catalog

STAMP N STORAGE SHOPPING

I love the products from Stamp-n-Storage. In full disclosure, I am an affiliate with Stamp-n-Storage which means I may get commissions if you click on links I provide and decide to purchase anything from this company. I highly recommend this company.

The content in this blog is the sole responsibility of Marcie Besecker as an Independent Stampin' Up! Demonstrator. The use of and content of classes, services or products offered is not endorsed by Stampin' Up!

[mc4wp_form id=”975″]

Archives

Categories

Content © Marcie Besecker, All Rights Reserved. Privacy Policy
Genesis for Wordpress customized by WebsByAmy.